This is how I’ve setup my Thinkpad X1 Carbon with functional fractional scaling support on Ubuntu 19.04. Hopefully this post serves as a beacon for everyone wanting a way out of the current buggy mess that is fractional scaling on Linux. The only limitation of this solution is that it doesn’t support dual monitors with different DPI settings. External monitors work well, as long as the laptop screen is closed.
This solution should work on any laptop with a high resolution screen. Most of this information is not specific to Ubuntu either, just GNOME. Still, some of the package names or locations for config files will probably be different in your distro.
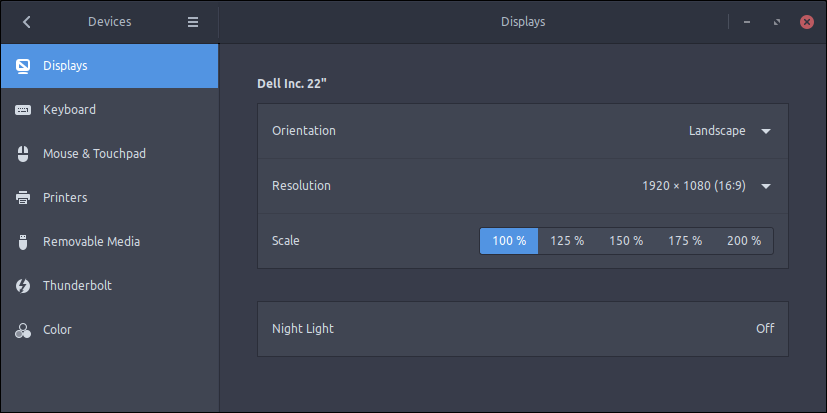
Ubuntu Display Settings with fractional scaling support enabled
HiDPI support on Linux has still a long way to go. GNOME supports integer scaling natively (2x or 3x) but that is usually too large for laptop resolutions, which look best with a scaling factor of 1.5x or 1.75x. Ubuntu 19.04 is the first release with GNOME 3.32, which includes experimental fractional scaling support, for both Wayland and X11. Unfortunately, they do say experimental for a reason, and its current state makes it difficult to recommend for day to day use.
Wayland support status
If you login on the Ubuntu Wayland session, you can run this on the terminal:
$ gsettings set org.gnome.mutter experimental-features "['scale-monitor-framebuffer']"
You may need to restart your session for it to take effect.
The command will enable fractional scaling on the Ubuntu Settings app, under the Display tab. The current implementation works very well for native Wayland apps, but the ones running via XWayland will appear blurry (see this bug report). Unfortunately, this means that the default Firefox package is affected, and such is the case with many of the snaps in the Ubuntu store, which was a dealbreaker for me.
For those curious souls interested in the saga, I’ve managed to piece together a timeline. I found the original bug report, dating back to April 2016. The pull request with the fixes can be found here and this is a blog post by the author itself, Marco Trevisan, doing a retrospective once the fix landed on GNOME 3.32.
X11 support status
Marco has also added support for fractional scaling for X11 sessions based on xrandr. It can be enabled running the following on the terminal:
$ gsettings set org.gnome.mutter experimental-features "['x11-randr-fractional-scaling']"
Again, you’ll need to restart your session before the changes are available for selection in the Displays section of the Settings app. As with the Wayland fix, this one also comes with its own set of drawbacks. Mainly decreased GPU performance, increased CPU usage and screen tearing. Unfortunately, I also experienced faulty scaling on fullscreen video when system overlays appeared (increasing or decreasing volume, screen brightness, etc.) which is why I decided against using it. There’s more info in this discourse thread.
Font Scaling
Another valid approach for the HiDPI nerds is to use font scaling. The benefits of this is that it won’t impact performance and it doesn’t introduce tearing but, and there always is one, this setting is applied system wide, and not per monitor. Meaning your HiDPI screens will look allright, while regular DPI monitors get the Fisher-Price look.
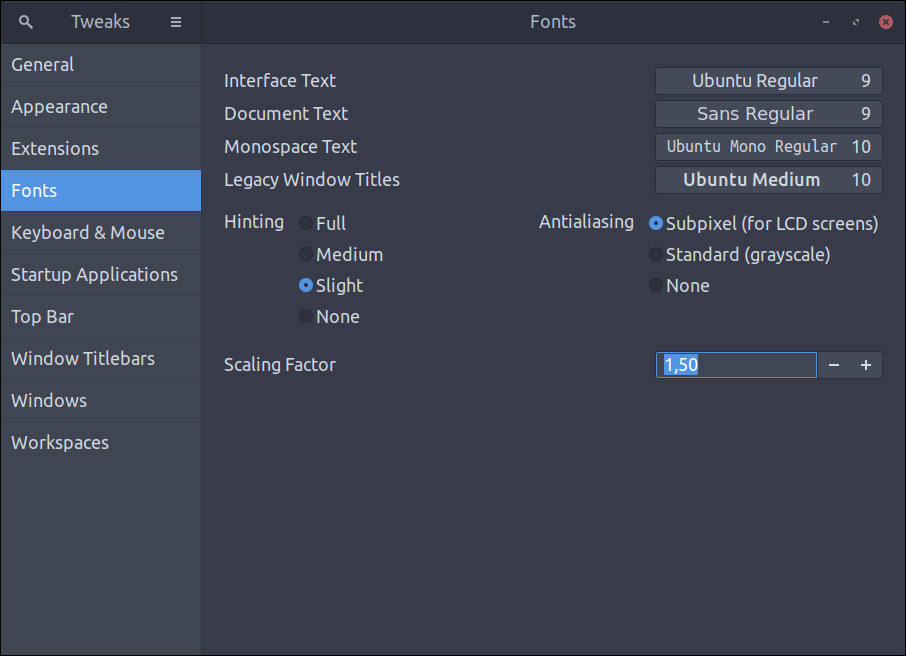
You can adjust this setting with the Gnome Tweak app. If you don’t have it installed, you can run this:
$ sudo apt-get install gnome-tweak-tool
The UI may look a little funky as well, since the spacing is all wrong. Attempt a session restart before dismissing it though. That seems to fix most of the weirdness in some apps (Firefox comes to mind). I’ve even seem some people setup scripts to automatically change the font scaling based on the DPI of the connected screen. I don’t think that solution supported hot plugging, but if anyone is interested, here it is.
Xrandr fix
If, like me, you weren’t satisfied with the previous experimental options, you can disable them both running:
$ gsettings reset org.gnome.mutter experimental-features
I still was unwilling to resign myself to GNOME looking like a Fisher-Price toy, with its 2x scaling, so I gave another chance to xrandr. xrandr has been the goto hack to bolt-on HiDPI support in Linux for quite some time. What it does, in short, is render the display to a higher resolution, and then scale it down to fit your screen. That zoom out effect effectively achieves fractional scaling. At the cost of GPU memory and CPU usage.
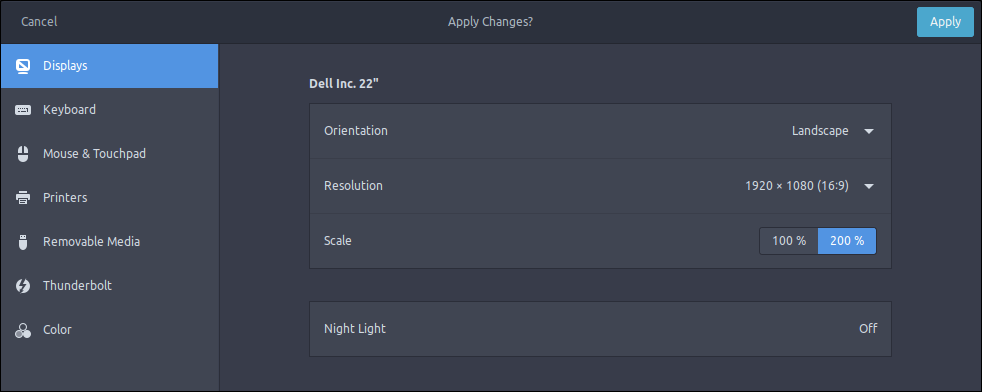
To set this up, you’ll first need to apply a 2x scaling factor on GNOME Display settings.
Once that’s done, we need to find the name of the screen. It should look similar to this:
$ xrandr
Screen 0: minimum 8 x 8, current 1920 x 1080, maximum 32767 x 32767
eDP1 connected (normal left inverted right x axis y axis)
2560x1440     60.01 +  59.95
1920x1440     60.00
...
eDP1 is the name of the laptop screen. Now that we have it, we can apply xrandr for the fractional scaling effect. Do remember to replace this command with the name of your screen:
$ xrandr --output eDP1 --scale 1.25x1.25
This scaling factor should be similar to the 175x setting in GNOME. You can play around with the scale parameter to suit your needs. The higuer the number, the smaller the UI will appear. You can read more about it in the ever helpful Arch Wiki.
If this works, you’ll probably want to make this fix permanent. As it stands, these settings will be lost on logout, but it is not too hard to apply them every time we enter the system. Open Startup Applications and add a new entry, with that same command you’ve just executed on the terminal. Like so:
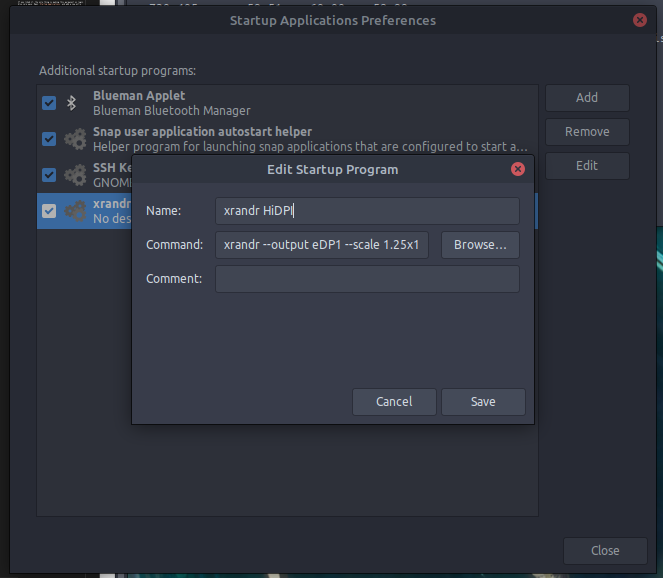
This will run the fix after every restart. The only gotcha I’ve come across is that it won’t be applied if you restarted the laptop while docked to an external monitor, but you can still run the command once you plug it out.
Now, if you’re lucky, this is all you’ll ever need to do. I barely noticed any performance hit, neither in CPU or battery usage, and the solution is very stable (it wasn’t the case on previous versions of Ubuntu). Still, there was one last thing that bothered me. When playing videos fullscreen, or games, there was a noticeable tearing effect. Apparently this is a known issue when using xrandr this way. Fortunately, the intel driver in Xorg has a setting that takes care of it. So if you’re using anything with integrated Intel graphics, which is everyone with an ultrabook, you can fix it.
You just need to create a file named 20-intel.conf on /usr/share/X11/xorg.conf.d as sudo with the following contents:
Section "Device"
    Identifier "Intel Graphics"
    Driver "intel"

    Option "AccelMethod" "sna"
    Option "TearFree" "true"
EndSection
This will force the intel driver to use Option "TearFree" "true", which will take care of the tearing issues. Restart your laptop and you should be golden.
I hope you found this post useful and enjoy the crisp font rendering you deserve. With any luck, all this information will quickly become obsolete, as HiDPI support becomes a problem of a past long forgotten. Until then, xrandr will be our saviour.